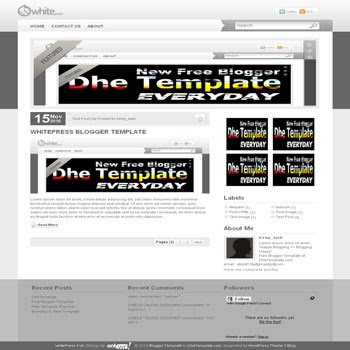


Free whitePress Blogger Template (Full Version)
If Static Pages has an error with your browsers such as Firefox and Chrome, please attention note the updatesPlatform Type :
Blogger / Blogspot
Name Template :
whitePress
Designer
http://onlywp.com/
Author :
Ireng Ajah
URL Author :
DheTemplate.com - http://www.theme2blog.com/
Description :
Free whitePress Template is an elegant and clean blogger template with adapted from WordPress Theme to Blogger Template with automatic image slider. This template is original design whitePress WordPress Theme from OnlyWp. Features of this template : 2 column template, 3 column footer template, image slider template, magazine style template, pagination for blogger ready, auto readmore template, banner 125×125px ready, comment avatar ready and more. This template suitable for all type of blogs.
Instructions :
Setting whitePress Simple Blogger Template
1. Setting Header and Logo
Go to Design > Edit HTML and find this code below :
<div class='header'><h1>whitePress</h1></div>
<a class='logo' href='/'>
<img alt='Whitepress Blogger Template' src='https://blogger.googleusercontent.com/img/b/R29vZ2xl/AVvXsEigbJWv5dcCufUrOMAu6OUbu-6etcBQUwr0JIf3s6idgVVvcSfxhx1BvJrX4NQi-_sLge5L9fDLWijfxfKyHuHC60o2-zNbromEtkKQxFCuZfMvzkL4-YbhixqRyvuAF3Ks37e-A4oCcn0/s1600/logo.png'/></a>
Change red color with your Title Blog, IMG ALT and Logo URL
2. Setting Image Slider
Go to Design > Edit HTML and find these code below :
<div id='wpFeatured'>
<div class='slides' id='Tab0'>
<a href='http://www.dhetemplate.com/'><img alt='free blogger template everyday' height='255' src='https://blogger.googleusercontent.com/img/b/R29vZ2xl/AVvXsEixEzOOV_WLnAimMKQh6sh6rp4gSD4WdYXCIAqHuiq02G3QAwe5PZ74xu_UemlT6_W8emWQXsX_5xFWGf2sNsCc0o63-sdjADFhA1AklonOYSSIsBOH7DH-tb6zffSb2YDvnJ2PAlWSkfw/s1600/free-template.jpg' width='851'/></a>
</div>
<div class='slides' id='Tab1'>
<a href='http://www.dhetemplate.com/2010/11/free-whitepress-simple-blogger-template.html'><img alt='WhitePress blogger template' height='255' src='https://blogger.googleusercontent.com/img/b/R29vZ2xl/AVvXsEiS5KwoKx8OMf33iDBDlyTo5eAaDnTLYzn73yN544yVTgCxDxleJ-7Efr-GQ_R8scK0XWJUxB0yOwrtCugD3sJUTvnGmX7ph5mHm338TTRcVBhOnCrSXmUoFQ05DTG9vy1wioVmVzf9YXk/s1600/WhitePress.jpg' width='851'/></a>
</div>
<div class='slides' id='Tab2'>
<a href='http://www.dhetemplate.com/2010/11/free-ireng-manis-v2-blogger-template.html'><img alt='ireng manis v2 blogger template' height='255' src='https://blogger.googleusercontent.com/img/b/R29vZ2xl/AVvXsEibUIyrwA3mI16jApqKamcWVNmUyAATMuHSmWjQw2mza4iviOhxATgeu0vwMsAvh59VXQAcOGpavvwURu8720Wo7Khy6-1QixgpjuPZMB-KPw78roKyp0ofGYU-EWq5ynOkFfVEAIUn-wU/s1600/Ireng-Manis.jpg' width='851'/></a>
</div>
</div>
<div class='fnav'>
<li><a class='navli' href='#Tab0' rel='0'>1</a></li>
<li><a class='navli' href='#Tab1' rel='1'>2</a></li>
<li><a class='navli' href='#Tab2' rel='2'>3</a></li>
</div>
Change the red color with your URL POST, IMG ALT, & IMG URL
3. Setting Twiiter & RSS Feed
Go to Design > Edit HTML and find this code below :
<div id='wpInformation'>
Change #Twitter_LINK & #RSS_LINK with yours
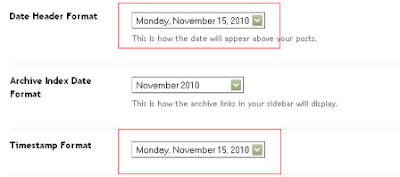
4. Setting Date
Format setting for date look like this image below

5. Setting Banner 125×125px
If you want to add banner 125×125px, the structure code look like this :
<div class="banner">
<a href='http://www.dhetemplate.com/'><img alt="image alt" src="https://blogger.googleusercontent.com/img/b/R29vZ2xl/AVvXsEi6fg9RV1I26Lf-WMjWknVwfQgEIAjsALitUqnjCI2B-_ZVXsWrRJABdTKgAGPlWSKRYWnO9sw-DgbzR25H-53Rm-qudLgJ9Rv9VCDVDUDbzevTWDppLRw2Qd7PeO2bfFJ3p_fEs4cEraKF/s1600/banner+dhe.jpg"/></a>
</div>
Similar Templates :
Whitedeo Blogger Template & Diversity Blogger Template
** Updates **
Go to Design > Edit HTML. Find this CSS code :
/* PageList */
#crosscol-wrapper{
margin: 6px auto 0;
background: url(https://blogger.googleusercontent.com/img/b/R29vZ2xl/AVvXsEjunStgg6nXD3oc6kDl0c725S1_trOIO6lG4YXKC7iCiY1u1pPLiRw1iJ9jX9ppzkiBAKMCZAJniz82Xp805hAtEbg5keQuuSoV-n6kc7rVy-0ygaBOGp3u08p1xGEwyTGLCb1_tQLQRJ0/s1600/menu.png) no-repeat top;
width: 912px;
height: 48px;
padding: 15px 0 0 38px;
}
.PageList{
height:30px;
padding:0;
width:500px;
margin:0;
float:left;
text-transform:uppercase;
}
.PageList li a{
float: left;
margin-right: 20px;
text-transform: uppercase;
font-size: 115%;
font-weight: bold;
}
.PageList li a:hover{
color: #a6a6a6;
}
.PageList li.selected a{
text-decoration:none;
}
.crosscol .PageList ul, .PageList ul, .crosscol .PageList li, .PageList li{
margin:0;
padding:0;
list-style:none;
outline:none
}
Change that code with this one :
/* PageList */
#crosscol-wrapper{
margin: 6px auto 0;
background: url(https://blogger.googleusercontent.com/img/b/R29vZ2xl/AVvXsEjunStgg6nXD3oc6kDl0c725S1_trOIO6lG4YXKC7iCiY1u1pPLiRw1iJ9jX9ppzkiBAKMCZAJniz82Xp805hAtEbg5keQuuSoV-n6kc7rVy-0ygaBOGp3u08p1xGEwyTGLCb1_tQLQRJ0/s1600/menu.png) no-repeat top;
width: 912px;
height: 48px;
padding: 15px 0 0 38px;
}
.PageList{
height:30px;
padding:0;
width:500px;
margin:0;
float:left;
text-transform:uppercase;
}
.PageList li a{
float: left;
margin-right: 20px;
text-transform: uppercase;
font-size: 115%;
font-weight: bold;
}
.PageList li a:hover{
color: #a6a6a6;
}
.PageList li.selected a{
text-decoration:none;
}
.crosscol .PageList ul, .PageList ul, .crosscol .PageList li, .PageList li{
margin:0;
padding:0;
list-style:none;
outline:none
}
Then, add this code below to hide the Static Page Title
#PageList1 h2 {display:none;}
exactly before ]]></b:skin> code


